|
|
 ANS Web Service is an auxiliary application for LanAtlas. It is included into LanAtlas Network Monitor package.
Enterprise license for LanAtlas Network Monitor already includes a license for ANS Web Service.
Holders of a Lite, Standard or Professional licenses may buy an additional license for Web Service separately.
ANS Web Service is an auxiliary application for LanAtlas. It is included into LanAtlas Network Monitor package.
Enterprise license for LanAtlas Network Monitor already includes a license for ANS Web Service.
Holders of a Lite, Standard or Professional licenses may buy an additional license for Web Service separately.
 Intro
Quick start
Settings
Advanced
Web Interface
System Requirements Intro
Quick start
Settings
Advanced
Web Interface
System Requirements
 This application works like an HTTP server and provides web interface for
LanAtlas. It means you can install Web Service on a local or remote system
and check (and control) LanAtlas in real time using a web browser on any computer that is
connected to the Internet.
This application works like an HTTP server and provides web interface for
LanAtlas. It means you can install Web Service on a local or remote system
and check (and control) LanAtlas in real time using a web browser on any computer that is
connected to the Internet.
Web Service allows you to check brief or detailed status of any test and folder. Also
you may disable or enable tests, reset statistics and force tests to execution.
You will be able to start and stop monitoring, enable and disable alerting, etc.
Features:
- All data transmission between LanAtlas and Web Service is encrypted and password protected;
- LanAtlas & Web Service allow you to setup different user accounts with different sets of permissions;
- Controlling the LanAtlas is not the only function of ANS Web Service. It can be used as a simple web server
providing access to files on a system where the Web Service is running. You may view HTML reports, logs and
settings from anywhere.
- Web service can be started as regular application or as Win32 service.
How to do (Quick start)
To allow remote management of LanAtlas via web browser follow these simple steps:
- start LanAtlas
-
configure LanAtlas's Remote Control Interface on RCI page in the Options dialog
Please note:
when an internet browser acquires the document from the internet it may fetch several parts of the document
at once to increase performance. Thus "Maximum simultaneous connections" option of the LanAtlas's RCI
interface should be set to 4 (minimum) even if just one user at a time will be connected to LanAtlas.
Otherwise the web browser may not be able to display a web page correctly.
- setup user accounts: use LanAtlas's menu "User"->"Operators"
-
start the Web Service. You can start it on the same system where LanAtlas is running or on any system
that has TCP/IP connection with LanAtlas's system. E.g. LanAtlas can be installed on the server inside
of a corporate network but Web Service can be running on your home computer.
- configure Web Service: provide an address of the LanAtlas's system and TCP port that you had specified for RCI
That's it. Now you can open web browser and enter an address of the system where Web Service is running (e.g. 209.173.80.15 or www.mycompany.com).
If you are running regular web server and our Web Service is installed on the same system, change the TCP port
of Web Service from 80 to any other (e.g. 81). In this case you will need to specify the port number in the URL
that you are typing in browser's window, e.g. http://www.mycompany.com:81
Settings
It is very easy to configure Web Service:
RCI (Remote Control Interface) settings
- Address: here you should provide an address of the system where LanAtlas is installed
(keep the default '127.0.0.1' if LanAtlas and Web Service are installed on the same system)
- Port: please provide TCP port that is used by LanAtlas's Remote Control Interface (1054 by default)
- Timeout: the maximum amount of time (in seconds) that Web Service will keep waiting
for the reply from LanAtlas before returning an error response to the browser.
Web server settings
- Port: TCP port on which Web Service will listen for incoming connections from the web browser
(default TCP port for HTTP protocol is 80. You may need to change it in case you already have
a regular web server running on the same system).
- Interface: allows you to select specific network interface on which Web Service
will listen for incoming connections from the clients (web browser). Default value for this parameter "0.0.0.0"
- all network interfaces installed on the system.
- Application status: set "Active" to activate Web service (it will then start listening for incoming
connections and will respond to HTTP requests from any web browser). If you start the software as a Win32 service
then web server will be activated regardless of this option at the system startup.
Win32 service mode:
This group of controls allows you to check the status of the Windows service, install/uninstall, start or stop the service:
- Install / Uninstall: this button allows you to install/uninstall software as a Win32 service
- Start / Stop: this button allows you to start/stop the service
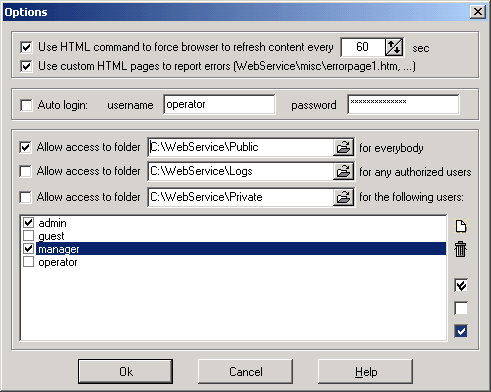
 Advanced options
Use menu Options -> Advanced to access dialog with some optional (non obligatory) settings.
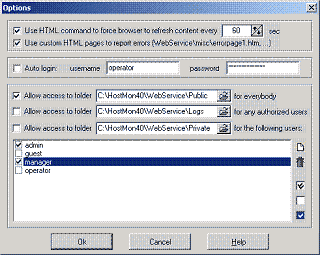
- Regular interface: force browser to refresh content every NN sec
- Compact interface: force browser to refresh content every NN sec
Normally the content of a web browser window is refreshed only after the user had pressed the refresh button
or after he had performed some operations (e.g. disabled or enabled a test). With these options enabled Web
Service will force browser to refresh the content every NN seconds.
- Use custom HTML pages to report errors
This option allows you to use custom configurable HTML pages to report errors. With this option enabled in case
of some problems Web Service will search 'misc' subdirectory for the following files:
| - errorpage1.htm | this page is used when Web Service cannot retrieve information from LanAtlas. E.g. RCI Interface is disabled or LanAtlas was not started at all. |
| - errorpage2.htm | this page is used when wrong (invalid) information is requested. For example this error may occur when another user have removed the test that you just want to check (retrieving detailed information about non existent test). |
| - errorpage3.htm | this page is used to report the error which indicates usage of incompatible LanAtlas and WebService versions. |
Please note: you may (and probably you should) use %WSResponse% variable in your custom HTML error pages. This variable represents actual error message (the response from Web Service).
Examples of error pages are found in 'misc' subdirectory. Feel free to change them according to your liking.
If an error page file does not exist, Web Service will use standard predefined error pages.
- Auto login
This option allows you to specify username and password that will be used when browser connects to Web Service.
This way user (who had started web browser to connect to LanAtlas) will not be prompted for a name/password
at all (unless you provide invalid name or password). We highly recommend to refrain from specifying accounts
that have rights to change LanAtlas's settings (e.g. stop monitoring or disable test items).
Controlling the LanAtlas is not the only function of ANS Web Service. It can be used as a simple web server
providing an access to the files on a system where the Web Service is running. You may view HTML reports, logs and
settings from anywhere.
Use the following settings for enabling multilevel access to files and folders of a system where Web Service
is running:
-
Allow access to folder <path to folder> for everybody
You may enable an access to a specified folder (and all subfolders) for anybody who uses web browser and is connected to Internet/Intranet.
Anybody on the Internet/Intranet will be able to access this folder without authorization.
Regardless of the real name of the shared folder on your computer it will be visible under the name "public".
For example if Web Service is running on the machine hostmonitor.mycompany.com then to access the shared
folder you should use this URL: "http://hostmonitor.mycompany.com/public/" (if the name of the of the
target file or folder is not specified then the closing "/" should always be present in url string).
-
Allow access to folder <path to folder> for any authorized user
You may enable an access to a specified folder (and all subfolders) for authorized users only. The user account with remote access
permissions should be present in LanAtlas. When the user will try to access this folder via internet he
will be asked to provide his user name and a password.
Regardless of the real name of the shared folder in the computer it will be visible under the name "authorized".
For example if Web Service is running on the machine hostmonitor.mycompany.com then to access the shared folder
you should use this URL: "http://hostmonitor.mycompany.com/authorized/" (if the name of the target file or folder
is not specified then the closing "/" should always be present in url string).
-
Allow access to folder <path to folder> for the following users
You may enable an access to a specified folder (and all subfolders) for specified user(s) only, (e.g. you may allow an access only
for "Admin" and "Manager"). The user account with remote access permissions should be present in LanAtlas.
When the user will try to access this folder via internet he will be asked to provide his user name and a password.
Regardless of the real name of the shared folder in the computer it will be visible under the name "private".
For example if Web Service is running on the machine hostmonitor.mycompany.com then to access the shared folder
you should use this URL: "http://hostmonitor.mycompany.com/private/" (if the name of the of the target file or
folder is not specified then the closing "/" should always be present in url string).
If you will allow an access to public or authorized folders where LanAtlas stores private logs (for some tests)
then the links to these private logs will be visible and users will be able to check the logs.
Note that the "private log" field must be included in the list of displayed fields.
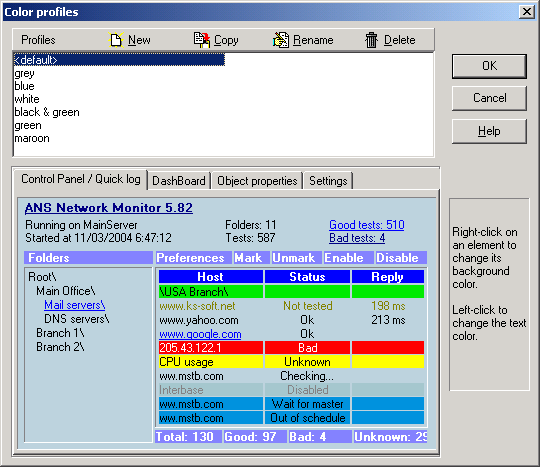
Colors
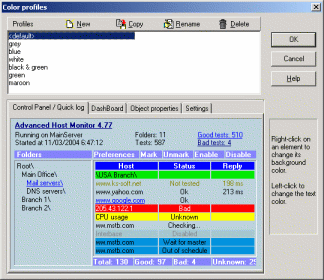 Each user may select a color palette for web interface according to his/her liking. Only users who have access to the
system where Web Service is running may control (create, delete and modify) color profiles. Use menu Options->Color
to bring up Color Profiles dialog window.
Each user may select a color palette for web interface according to his/her liking. Only users who have access to the
system where Web Service is running may control (create, delete and modify) color profiles. Use menu Options->Color
to bring up Color Profiles dialog window.
You can fully customize color schemes for the Control Panel, DashBoard, Quich Log and other panels.
To manipulate with color schemes use 4 buttons:
| New | Create new palette. |
| Copy | Copy selected palette. This is useful if you want to make small modifications for the existing color palette. |
| Rename | Change palette's name. |
| Delete | Remove selected palette; you can remove all but one (the one named <Default>) color schemes. |
To modify colors of the selected palette, click on the element which you want to change color for. Use right-click on
an element to change its background color, and left-click to change the text color.
Web Interface
When you start a new instance of the browser and request information from the LanAtlas, the browser first will
ask for your name and password. You will get the rights and permissions that are specified in your user account.
E.g. admin can perform any operations, guests can only view test statuses, etc.
After passing authentication Web Service takes you to the window where you may switch between 3 main workplaces:
Control Panel, DashBoard and Quick Log.
You may easily switch between workplaces within the same browser window or
you may open several browser windows, each of them with a different workplace.
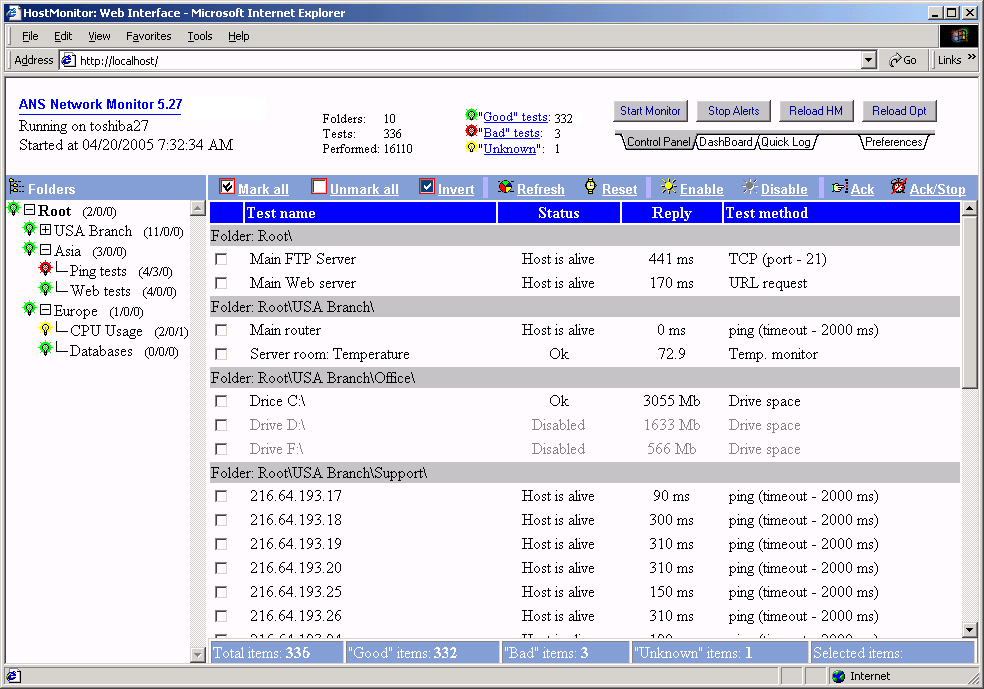
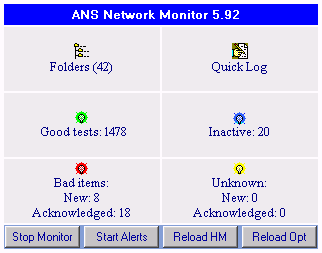
1) Control Panel
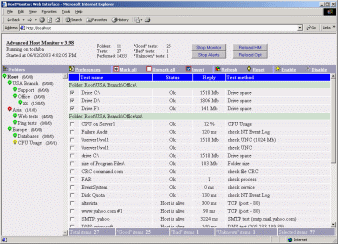
Control Panel provides the interface which resembles slightly LanAtlas's own GUI.
This workplace has three major areas.
The upper part of the main window is a Status bar that displays general information about LanAtlas.
Left part of the main window is a Folder section that displays information about all folders
of LanAtlas.
The right part - Test section shows the detailed information about the tests either from
within the selected folder(s). The footer of the Test section shows a brief summary of what you see in the main window.
Status Bar
In the upper part of the browser window the following general information and options are available:
- Version of the host monitor and the name of the system where the Host Monitor is installed.
- The date and the time when the LanAtlas was started on that system.
- The whole number of tests (the number of performed tests is shown separately).
- The number of test folders.
- The number of tests with "good", "bad" and "unknown" results. You may click on links beside the numbers to
check corresponding lists displaying good, bad or unknown test items (for all folders and subfolders).
You may also perform the following "global" actions using the buttons located in the status bar.
-
"Start/Stop Monitor"
this button starts or stops all monitoring. The caption of the button changes to reflect the
current state of the LanAtlas on the remote (local) system. When it says "Start Monitor" it means that the
LanAtlas is currently stopped and you have to press this button to force it to start monitoring.
When it says "Stop Monitor" it means that the LanAtlas already performs monitoring and you may press this
button to forcibly stop monitoring.
-
"Start/Stop Alerts"
this button starts or stops alerts of the LanAtlas. The caption of the button changes to
reflect the current state of the Alerts on LanAtlas. When it says "Start Alerts" it means that the Alerts are
currently stopped and you have to press this button to force them to start again. When it says "Stop Alerts" it
means that the Alerts are now on and you may stop them by pressing this button.
- "Reload HM"
this button forces the system to reload the LanAtlas.
- "Reload Opt"
this button forces the LanAtlas to reread its` settings from the .ini file.
After you click any of the buttons mentioned above a confirmation browser window will popup telling you which action
was performed.
Folder section.
Here you see the list of all folders and subfolders available in LanAtlas. If you click on the folder name you will see the list of tests from that folder in the right pane of interface window.
Each folder has an indicator to the left of the folder name. When an indicator is green it means that all the tests in
this folder have "good" status, yellow means that one or more tests have "unknown" status, red is an indication that
at least one test has a "bad" status.
Click on indicator to check folder properties or to see corresponding lists displaying good, bad or unknown test items
for the folder.
There are also numbers to the right of the folder name. They show the number of "good"/"bad"+"warning"/"unknown" tests in the
folder.
Test section
This is the main part of Control Panel. It displays the list of all tests from within the selected folder.
The first field in a list is always a link. This link will take you to a new window with detailed information about the test.
You may set Web Service to show you any available property of the test in this list, sort them, filter by the status and perform the following actions with tests:
- Select the test, use the checkbox in front of each test name. Mark it to select the test or unmark it to deselect it.
- [Mark All] - selects all tests in the list.
- [Unmark All], use this command to unmark (clear) all checkboxes at once.
- [Invert], inverts the selection thus selecting those tests that were not selected before and deselects those that were selected.
- [Refresh], refreshes the information about selected test(s) by forcing them to execution.
- [Reset], resets the statistics for the selected test(s).
- [Enable], enables selected test(s).
- [Disable], disables selected test(s).
- [Ack], use this link to acknowledge test(s) status.
- [Ack/Stop], acknowledge status and stop alerts.
The footer of the Test section shows a brief summary of what you see in the main window.
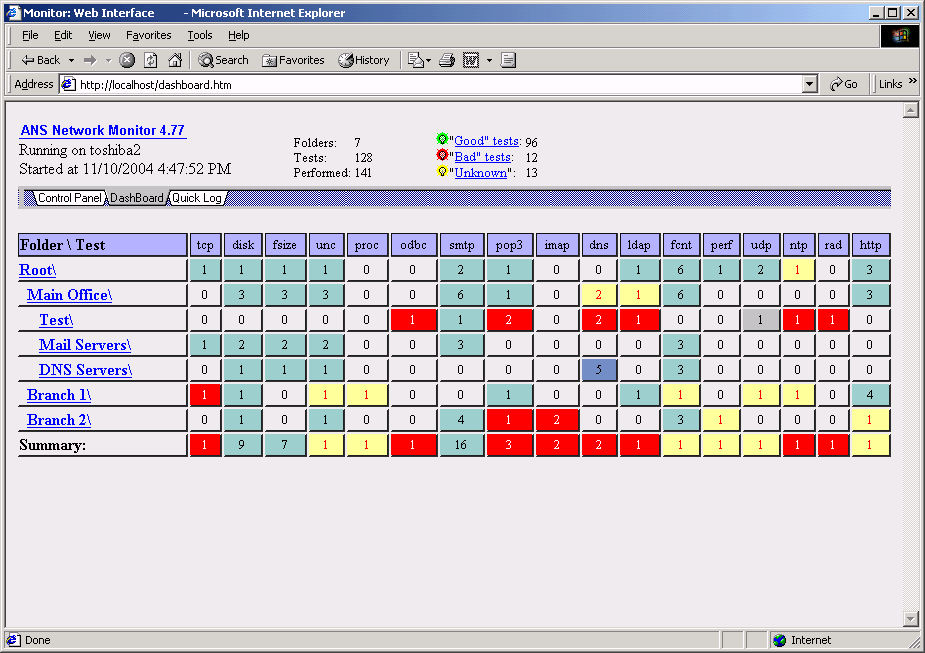
2) Dashboard
Dashboard is actually an indicator panel. One glance at the dashboard will give you comprehensive overview of all
tests in all folders.
Every folder is represented by a row on the dashboard. Each cell of the row represents tests of a certain type from
within that folder (e.g. Ping, CPU Load, Service, Drive Free Space). Number inside cell and their color depend on
the tests results:
|
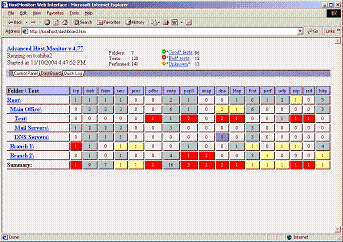
|
| Color | Meaning of the color of the cell | Meaning of the number in the cell |
| N | Some test(s) have "bad" status (non-acknowledged) | Number of "bad" test items |
| N | No "bad" tests but some test(s) have "warning" status (non-acknowledged) | Number of "warning" test items |
| N | No "bad" or "warning" test items but some test(s) have "unknown" status (non-acknowledged) | Number of "unknown" tests |
| N | There are some "bad", "warning" or "unknown" items, all of them acknowledged | Number of acknowledged tests |
| N | No "bad"/"unknown" tests but there are "WaitForMaster" test item(s) | Number of tests with "Wait.." status |
| N | ALL tests are disabled | Number of disabled tests |
| N | All tests have "OutOfSchedule" status | Number of "OutOfSchedule" tests |
| N | No "bad"/"unknown"/"WaitForMaster" items, some (all) tests are "good" | Number of "good" test items |
| 0 | No tests of this type in the folder | 0 - no tests |
You may click on any folder name to check folder properties or to see corresponding lists displaying good, bad and
unknown test items as well as complete list of tests in the folder.
Clicking on the cell will bring up the list of those tests which have determined current status (color and value) of
the cell. For example if you click on "red" cell that represents Ping tests for "USA Office" folder, you will see
all "bad" ping tests within that folder.
Than you may click on any test in the list, Web Service will provide detailed information about selected test.
3) Quick Log
Quick Log workplace displays most recent events. The term "event" means a log record that was added with every test
status change. If logging mode for some test is set to "Reply" or "Full", LanAtlas adds a new record when either
the test status or "Reply" field value of the test changes.
Quick Log provides links to test properties. Click on the name of the test and the Web Service will display the
Test Properties window.
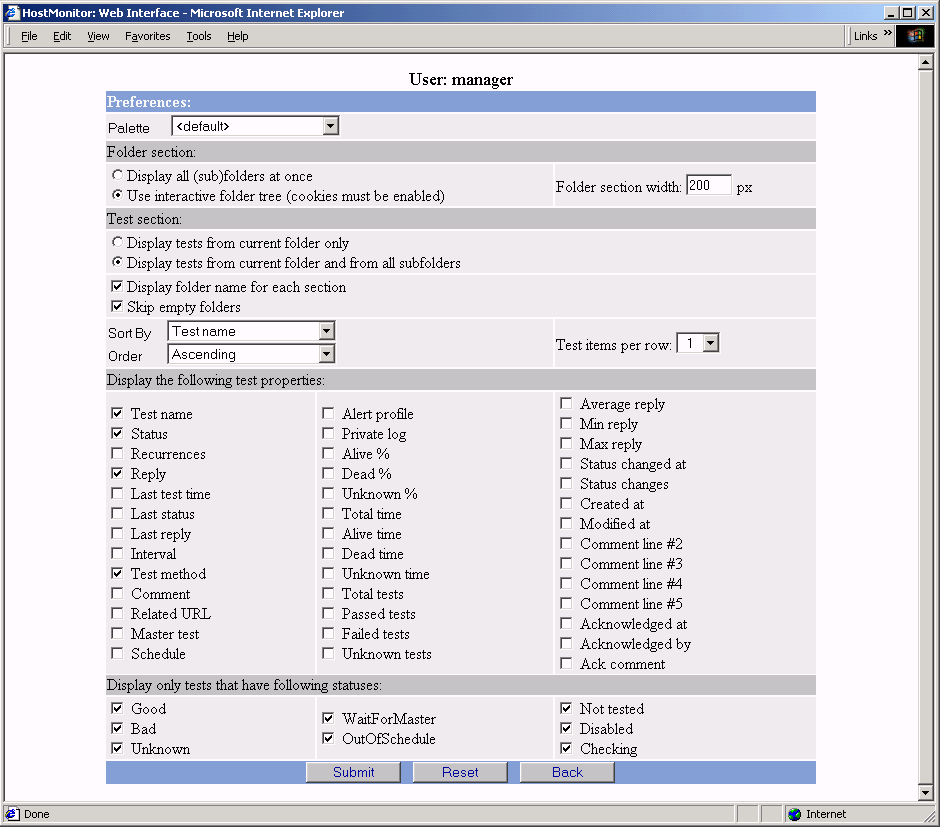
Preferences
This link brings up the options/settings window. The settings and options that you define through this window are
individual for each user and they are stored with Web Server so that when you will log in to LanAtlas next time
(even from some another computer) your settings from the previous session will be saved for you.
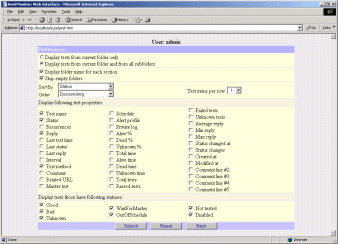 The following options are available:
- Palette
Here you may choose a color palette for Web Interface. Please note: only persons that have access to system where
Web Service is running can modify predefined palettes or create new palettes.
- Display all (sub)folders at once
With this option selected Web Service will always display expanded view
of all folders and descendant subfolders in the Folder section.
- Use interactive folder tree (cookies must be enabled)
With this option selected you will be able to expand or collapse any folder(s).
- Folder section width
This parameter allows you to set the default width (in pixels) for the Folder section.
-
Display tests from current folder only
When this option is enabled the right pane will show you only the tests from the current folder (the one that is
selected through the left pane; the name of this folder is shown in bold) not including the tests from the
subfolders.
- Display tests from current folder and all subfolders
This option allows you to see all tests from the current folder and all of subfolders.
-
Display folder name for each section
This option lets you to see the name(s) of folder(s) in the right pane of the window. The folder name appears at
the begining of the list of tests from within that folder. You may found this option useful especially when the
current folder has lots of subfolders.
- Skip empty folders
After enabling this feature folders that have no tests in them will disappear from the right pane.
- Do not wrap text at the right margin
If this option enabled, Web Service tells visual user agents (web browser) to disable automatic text wrapping. Otherwise browser may show test property (e.g. Reply field) in several lines.
- Sort by, here you may specify the field to sort the tests by.
- Sort order, you may set the ascending or descending sort direction.
- Test items per row
This option allows you to place more then one tests in each row of the tests list, so that tests will be
arranged in columns.
- Display the following test properties
This is an array of checkboxes, by marking/unmarking them you may specify the list of fields (test properties)
to display.
- Display only tests that have following statuses
Here you may filter the list of tests forcing the Web Service to show you only the tests with certain statuses.
Please note: if "Checking" switch is marked, Web Service will display "Checking.." for test items which
LanAtlas is checking right now). Otherwise you will see status that said test items had just before check
was started.
After you had changed any of the options do not forget to hit "Submit" button. Only after this the
changes will take effect. Hitting the "Back" button in the settings window as well as the browsers back button will
discard all your changes. The button "Reset" sets all settings to their default values. Note, after you have changed
the settings in web interface you may need to click browsers "refresh" button to see immediate results of the changes.
Compact Web Interface
In addition to the standard web interface (available by http://web_server_address/index.htm link) Web Service
provides a second one, which is more suitable for mobile devices with a small screen (PDA, smart phone).
To access this service use the following links:
http://web_server_address/compact.htm
http://web_server_address/tiny.htm
http://web_server_address/links.htm
|
Minimum system requirements
The system on which you plan to run the ANS Web Service should meet the following requirements:
- Windows 95 (OSR2), 98, ME, NT 4.0, Windows 2000, Windows XP Professional or Windows Server 2003
- TCP/IP connection (LAN or Dial-up)
- 1 Mb of free disk space
Internet browser requirements
You may use almost any web browser to work with ANS Web Service. However the following requirements for the
browser are essential:
- browser must support styles
- browser must support java script
- browser must support frames
- browser must support forms
Recommended:
|

 Advanced options