|
|

|
RMA Manager is an auxiliary application for LanAtlas. It is included into
LanAtlas Network Monitor package. Enterprise license for LanAtlas Network Monitor already includes a license for
RMA Manager. Holders of a Lite, Standard or Professional licenses may buy an additional license for
RMA Manager separately.
|
 Intro
How to do
Menu
System Requirements Intro
How to do
Menu
System Requirements
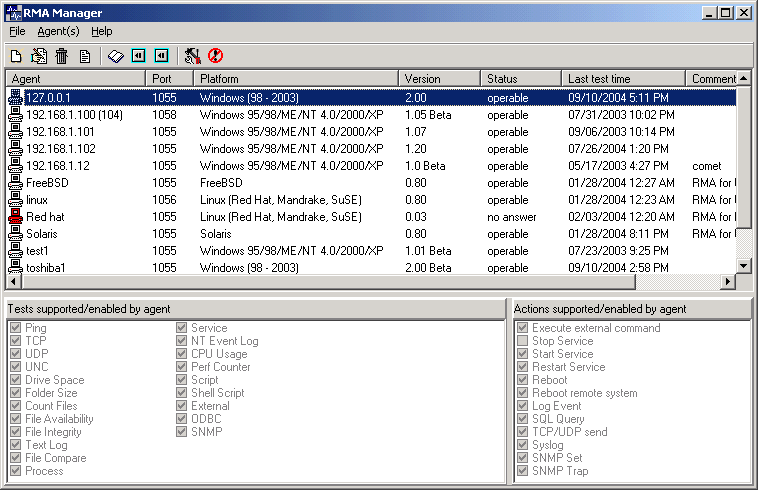
 To manage an array of Remote Monitoring Agents (RMA) you may use RMA Manager utility.
It allows you to change settings for hundreds of agents installed on remote systems at one time and from one location.
Both RMA Manager and LanAtlas are using the same list of Remote Monitor Agents. Working with this list you may select
group(s) of agents and then perform the following actions over the whole group:
To manage an array of Remote Monitoring Agents (RMA) you may use RMA Manager utility.
It allows you to change settings for hundreds of agents installed on remote systems at one time and from one location.
Both RMA Manager and LanAtlas are using the same list of Remote Monitor Agents. Working with this list you may select
group(s) of agents and then perform the following actions over the whole group:
- obtain information about an agent: version, platform, list of tests supported by the agent, list of allowed tests, etc;
- change agent configuration: change TCP port, timeout, password; enable/disable tests, change different management parameters, etc;
- reload agent (restart application);
- force agent to reread settings from its ini file;
- terminate agent
- and even upgrade agent's code remotely.
The list of agents may be exported into CSV file. After some modifications that file may be then imported back
again into RMA Manager.
How to do:
How to add new agent to the list
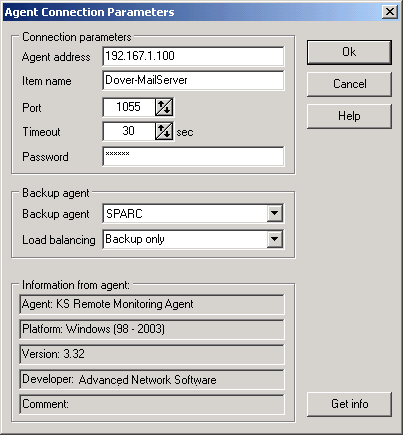
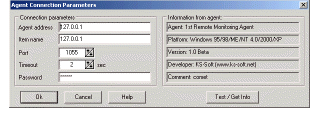 To add a record for a (new) agent click on "New agent" button or press Insert key in the list of agents or
select "New" item from "Agent(s)" menu. When the dialog "Agent Connection Parameters" appears set the following
parameters for the agent:
To add a record for a (new) agent click on "New agent" button or press Insert key in the list of agents or
select "New" item from "Agent(s)" menu. When the dialog "Agent Connection Parameters" appears set the following
parameters for the agent:
- Agent address:
provide the host name or an IP address of the system where RMA is installed
- Item name:
name of the agent (this name will be displayed in agent's list, and will be used by LanAtlas for agent identification).
By default RMA Manager uses agent's addresses as names but you may specify any other name that you like
- Port:
TCP port that will be used for communication between RMA Manager (or LanAtlas) and the agent.
Here you should specify the same port that you have already specified when that agent was installed and
configured on a remote system (by default agent uses port #1055)
-
Timeout:
communication timeout in seconds. A maximum amount of time that RMA Manager or LanAtlas will wait for an
answer from the agent. Please note: this timeout should be big enough to allow an agent to perform a test
before sending an answer to LanAtlas. When, for example, you are launching an external test
and an external program needs 15 seconds to perform this test then the timeout should be set to 15 seconds
plus an amount of time that is necessary for data exchange between LanAtlas and an agent.
- Password:
here you should provide the same password that you have specified when an agent was installed and
configured on a remote system.
After you have finished entering the above information click "Test/Get info" button to check the settings of an
agent or click "Ok" button to check the settings and close dialog. RMA Manager will try to establish connection
with an agent and get information about agent: platform, version, comment, etc.
If connection with an agent was established, RMA Manager updates all agent information and sets status of the
agent to "operable". If RMA Manager was not able to get proper information from an agent, it sets its` status to
"no answer" (if no answer from agent received) or "bad answer" (if some error code was received from an agent,
e.g. wrong password)..
Backup agent
Since the version 6.00 LanAtlas allows you to setup primary and backup agents. Using this feature,
LanAtlas is able to balance load between agents and use the backup agent when primary one does not respond.
Yes, RMA is pretty stable software however system may not respond due to some hardware or network error.
When you have installed second agent you may choose one of two different "Load balancing" options:
- Backup only
In this case, LanAtlas will request the main agent to perform the tests and will switch to backup agent only in the case of the primary agent not responding.
- 50/50
With this option selected, LanAtlas will balance requests for service between the agents. Even if you specify a single primary agent for all your tests, some tests will be performed by primary agent and other by backup RMA. If the primary or the backup agent does not respond, tests will be performed by another (paired) RMA.
| Note 1: |
"Primary agent" - the agent that is specified for the test execution. As you may specify different
agents for different test items, the same agent can be a "primary" and "backup", depending on the situation.
For example, you may use AgentA to perform set of WMI tests and use AgentB to perform SNMP tests. In case
of an emergency AgentB may execute WMI tests as well (AgentB is backup agent for AgentA). AgentA may perform
SNMP tests in the case of AgentB failing (AgentA is backup agent for AgentB). |
| Note 2: |
Options on Misc page in the Options dialog allow the behaviour of the tests when
primary agent does not respond to be specified. "If backup agent is specified and connection to primary RMA
failed" parameter allows you to choose one of the two options:
- Set "Unknown" status, log the error, then repeat test using backup agent
- Request backup agent without reporting error
|
How to edit connection parameters for the agent
To change connection parameters for an agent, select it from the list and press Enter (or choose "Edit connection
parameters" item in "Agents" menu). An "Agent Connection Parameters" dialog will pop up, there you may setup
connection parameters (agent address, port, timeout, password, etc) like it was already described in previous
abstract ("How to add new agent to the list").
How to obtain information about agent(s)
When you create a new agent record in the list, RMA Manager tries to connect to a specified agent and gets
information from it. But you can refresh/reload this information at any time. Just select a set of agents
(or select just one record), and choose "Refresh info" item from the menu "Agent(s)" or press CTRL + I.
RMA Manager will then try to connect to each agent being selected and gets the following information:
- Agent: an internal name of an agent;
- Platform: OS platform that this agent is designed for;
- Version: the version number of the agent;
- Developer: the company that created RMA software;
- Comment: the content of a comment field that you or system administrator had provided when a remote agent was
installed and configured.
If a connection with agent was established, RMA Manager updates all information and sets the status of an agent
to "operable". If RMA Manager was not able to get information from an agent, it sets the status to "no answer"
(if no answer from an agent was received) or "bad answer" (if some error code was received from an agent, e.g.
wrong password).
How to reload/terminate agent(s)
You may reload or terminate an agent on a remote system. It is obvious, that to be able to perform either of these
operations an agent should be running and an option "Enable remote management from address" should be enabled.
An IP address specified in "Enable remote management from address" of that agent should match the address of the
system where you are currently working with RMA Manager.
To reload/terminate agent(s), select a group of agents (or just one agent) in the list and click
"Reload agent"/"Terminate agent" button on the tool bar (or use similar item from the menu "Agents").
How to upgrade agent
First: to upgrade an agent you need at least to have a newer version of agents` software.
Second: an agent of older version should be already running on the remote system.
Third: "Enable remote updates from address" parameter of the agent configuration must be enabled and an IP address
specified by this option should point to the machine where you are currently working with RMA Manager.
Of course all operations with agent(s) are encrypted and password protected but this option provides additional
security (an extra security is never superfluous :-).
So, to upgrade agent(s), select a group of agent items in the list and click "Upgrade agent" button on the tool bar
(or use similar item from menu "Agents"). The dialog will prompt you to select the file with newer version of
agents` software code. After this RMA Manager will send this file to all selected agents. Agents then will write
that file to the hard drives of their remote systems and restart themselves. After the completion of this
operation an agent with a new code will run on each of the remote systems.
Similarly you may upgrade the configuration utility (rma_cfg.exe) on the set of remote systems*.
The only difference is in using the menu item "Upgrade configuration utility" instead of "Upgrade agent"
and selecting new version of "rma_cfg" utility for upgrade.
*Note: RMA version 3.10 or higher must be running on those remote systems.
How to change agents settings
 You may change settings of many agents at one time. Obviously those agents should be running. An agents` setting
"Enable remote management from an address" should be enabled and an IP address specified there should point to
the machine where you are currently working with RMA Manager. This is an additional measure that together with
password protection and encryption of all communications between RMA Manager and an agent provides extra security.
You may change settings of many agents at one time. Obviously those agents should be running. An agents` setting
"Enable remote management from an address" should be enabled and an IP address specified there should point to
the machine where you are currently working with RMA Manager. This is an additional measure that together with
password protection and encryption of all communications between RMA Manager and an agent provides extra security.
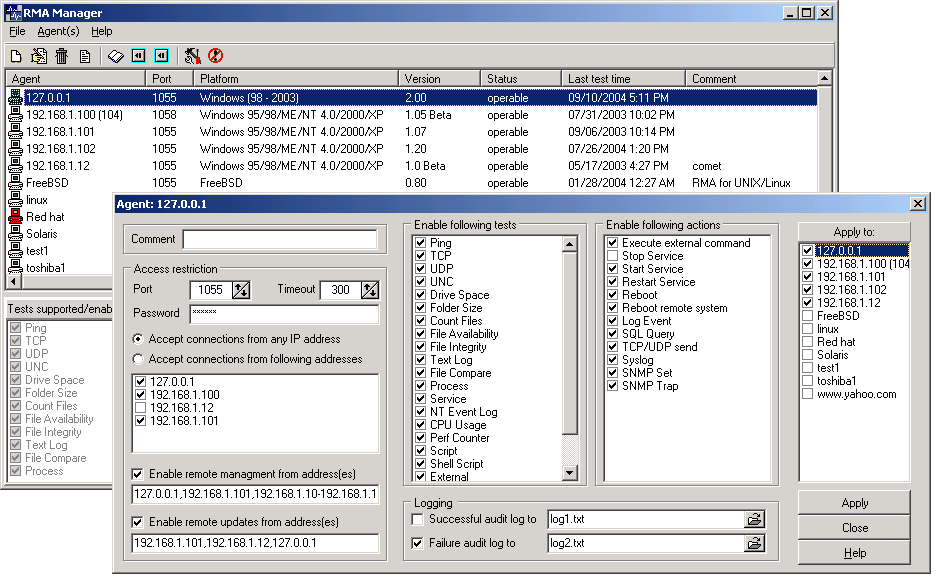
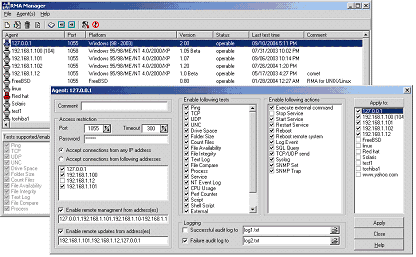
To view/modify agent(s) configuration, select group of agents in the list and click "Agent configuration" button
on the tool bar (or use similar item from menu "Agents"). RMA Manager will then connect to a first agent from the
group and after getting its` configuration settings will display them in the dialog window. The following
individual settings and groups of settings are available:
Comment:
here you may specify a comment (actually you may type any text here, it could be a simple recognizable name or an identifier for this agent).
This helps to identify agents easier.
Connection parameters
- Port
specifies the TCP port number which RMA utilizes to listen for incoming connections. Default setting is #1055.
- Timeout
the maximum amount of time (in seconds) that agent will keep waiting for the complete request packet from LanAtlas
(after initial TCP connection established) before dropping the connection.
- Password
minimum six character length password. Using of an empty password is not permitted. The password is required for
every communication session between RMA and LanAtlas or RMA and RMA Manager. All traffic between RMA and
LanAtlas or RMA and RMA Manager is encrypted and the password itself is never transmitted through the network
without encryption.
Security settings
- Accept connections from any IP address
enabling this option will allow RMA to accept control commands from any IP address (as long as the incoming
connection provides correct password)
- Accept connections from following addresses
specifies the list of IP addresses. After enabling this option RMA will accept remote connections only from the
addresses in this list (password is required as always).
Usually you have to add just one address to this list, namely the one for the system where LanAtlas is running.
To add an address to the list press Insert key, to remove an address from the list press Ctrl+Del, to edit item press
Enter or double-click it.
- Enable remote management from address
this option sets the IP address from which it is allowed to control and manage RMA. Using RMA Manager installed on
the system with that IP address you will be able to change agent's settings remotely, also you will be able to
restart and terminate an agent.
Note: Instead of single IP address you may specify a list and/or a range of IP addresses.
IP addresses in the list should be separated by comma. Dash is used to define a range of
addresses. Example: "127.0.0.1, 192.168.13.10 - 192.168.13.99, 165.14.22.1".
- Enable remote updates from address
this option allows remote updates of the RMA code (e.g. when a new version is available) from the IP address being
provided.
You may provide single IP address or you may specify a list and/or a range of IP addresses.
IP addresses in the list should be separated by comma. Dash is used to define a range of
addresses. Example: "127.0.0.1, 192.168.13.10 - 192.168.13.99, 165.14.22.1".
- Enable following tests
specifies the list of tests methods allowed for execution by this RMA. To enable a test mark the corresponding check
box, to disable a test unmark the box near it.
- Enable following actions
specifies the list of actions allowed for execution by the agent. To enable a action mark the corresponding check
box, to disable a action unmark the box near it.
Logging
- Successful audit log to
here you may specify a log file where agent will store information about successfully accepted connections.
This log has no use when everything works well (it then just takes space on the hard drive), but you may found it
really helpful when a sophisticated network problem has to be fixed. If you specify just the name of the file
(without a full path), an agent will store a log in the same directory where it was started from.
- Failure audit log to
you may specify another log file where an agent will store information about rejected requests. E.g.: connections
from an IP addresses that are not allowed or connections with invalid password, etc. Log file is a simple text file
that contains date of the event, remote IP address from which an attempt of connection has occurred and information
about the error. If you specify just the file name (without path), an agent will store it in the directory where it
was started from.
After you have made changes to the settings above, you may refine the list of agents that will accept these settings
(an "Apply to" list). By default this list contains all those agents that were selected before you have pressed
the "Agent configuration" button. You may remove or add new agents from/to the list.
After you click "Apply" button the new settings will be sent to the agents.
You may click "Cancel" button if you have changed your mind.
Main menu:
| File |
| Export | - | Exports list of agents into CSV (comma separated values) file |
| Import | - | Imports list of agents from CSV file |
| Exit | - | Closes RMA Manager |
| |
| Agent(s) |
| New | - | Brings up "Agent Connection Parameters" dialog and allows you to to add a new record for a (new) agent into the list |
| Edit connection params | - | Allows you to change agents' network connection parameters |
| Remove agent | - | Removes agent's record from the list (doesn't do anything with an agent itself) |
| Refresh info | - | Establishes connection with agent(s) and retrieves agents information (version, status, etc) |
|
| Agent configuration | - | Allows you to modify configuration of the agent(s) |
| Reload settings | - | Forces selected agent(s) to reread their settings from ini file |
| Reload agent | - | Reloads (application) selected agent(s) |
|
| Upgrade agent | - | Upgrades the code (using specified executable module) for selected agent(s) |
| Terminate agent | - | Terminates execution of selected agent(s) |
|
| Select all | - | Selects all agent records from the list |
| |
| Help |
| Help | - | Displays Help |
| Home page | - | Starts default web browser, opens home page of the RMA Manager on www.networksoftware.biz |
| WWW Forum | - | Starts default web browser, opens web forum on www.networksoftware.biz |
| Support | - | Allows you to send e-mail to our tech support staff |
|
| About | - | About RMA Manager |
| License | - | License information, registration |
Minimum system requirements
- Windows 95 (OSR2), 98, ME, NT 4.0, Windows 2000, XP Professional or Windows Server 2003
- Internet Explorer 4.0 or higher (application can work without IE but help system will not be available)
- TCP/IP connection (LAN or Dial-up)
- 2 Mb of free disk space
- Minimum screen resolution: 800 x 600
Recommended:
- Internet Explorer 5+
- Screen resolution: 1024 x 768 or higher
|